

Payout Campaigns: Setup Guide
Step-by-step instructions for creating, managing, and dispatching gift card payouts — from the dashboard or the public API.
Overview
Payout Campaigns let you send gift card rewards to multiple recipients in a single batch. Each campaign defines the branding, messaging, and the gift card brands recipients can choose from. Once a campaign is active, you can dispatch payout orders containing recipient lists — each person receives a personalized email with a unique Redeem link, completes a quick verification step, and selects a brand from the catalog you've curated.
This guide covers two ways to use Payouts: the GIFQ dashboard for one-off and recurring sends, and the public REST API for programmatic and product-embedded dispatching.
Campaign Lifecycle
Campaigns follow a defined lifecycle with explicit status transitions. Understanding each state and its allowed actions is the foundation for managing campaigns at scale.
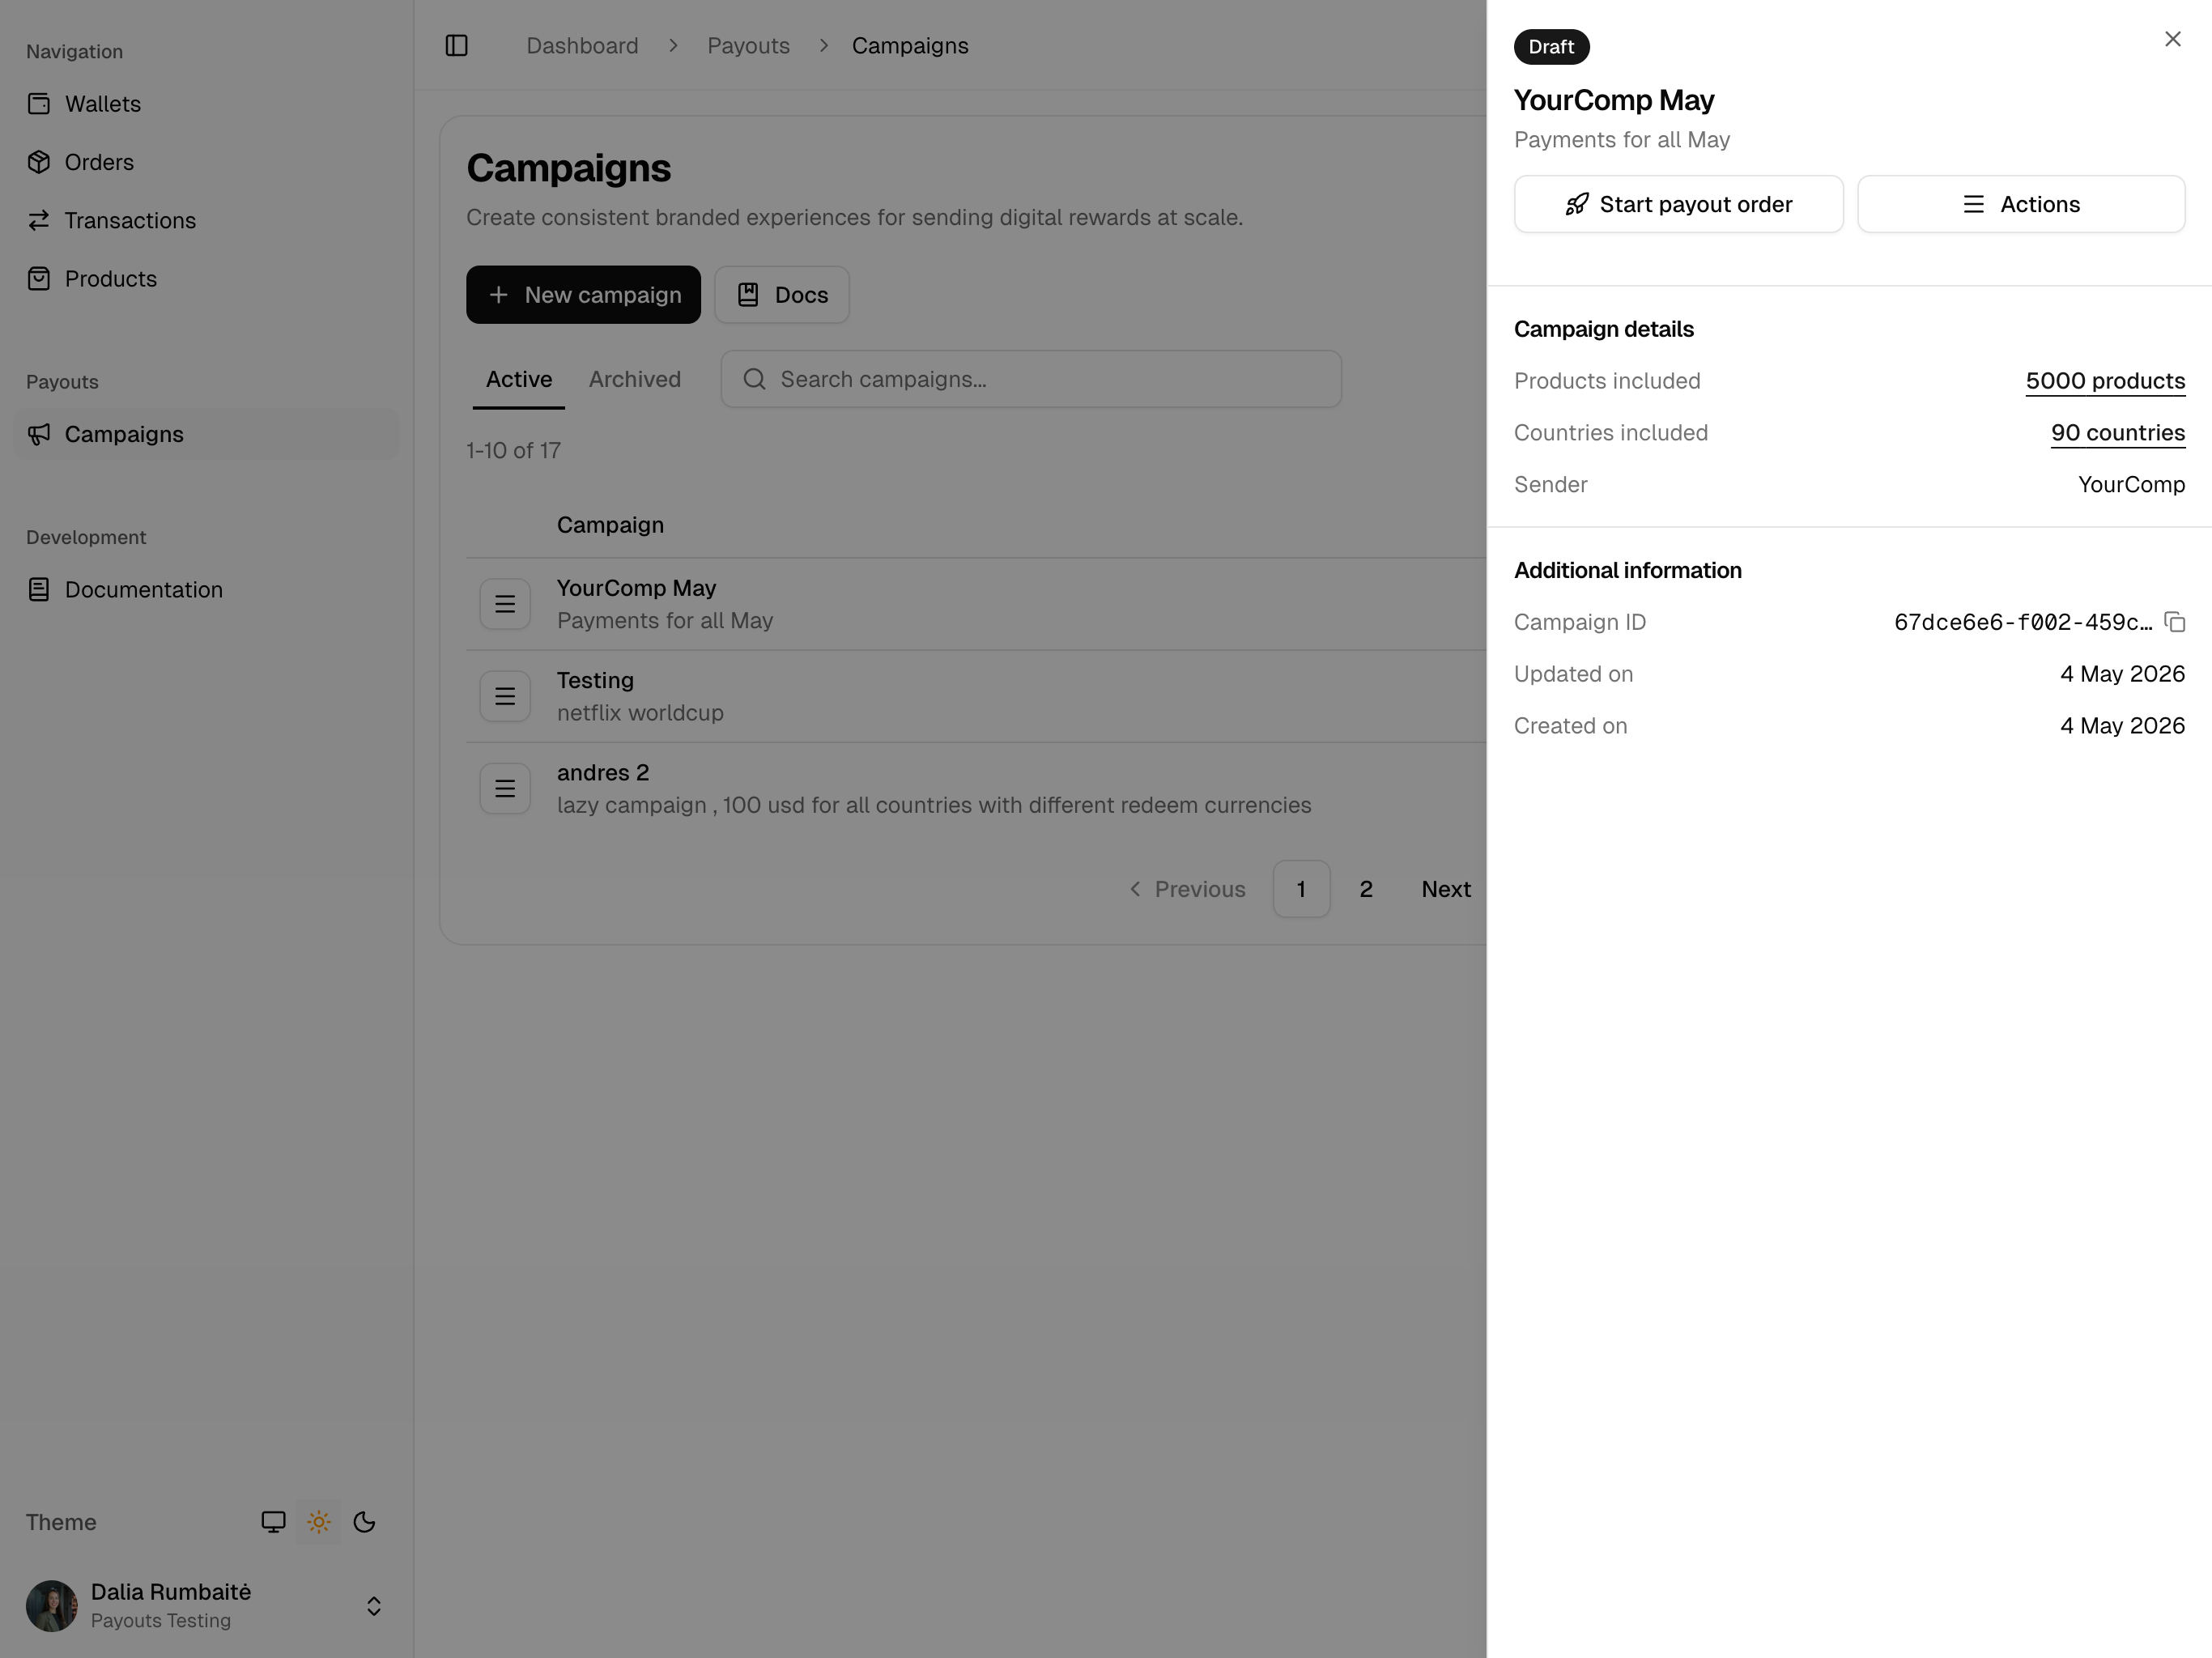
Draft. Initial state. Freely editable — title, brands, email and webpage templates can all be changed. Allowed actions: edit all fields, add or remove brands, activate, archive.
Active. Live and ready for dispatching payouts. Text fields remain editable; brand selection is locked. Allowed actions: edit text fields, dispatch payouts, pause.
Paused. Temporarily halted. New dispatches are blocked. Recipients with already-issued payouts can continue redeeming. Allowed actions: resume (reactivate), archive.
Archived. Soft-deleted. Hidden by default in the dashboard. Allowed actions: view only (read-only).
Valid transitions: Draft → Active → Paused → Active (loop) → Archived. Draft → Archived is also allowed.
Activation requirements
A campaign must have at least one selected brand AND a non-empty email subject AND a non-empty email body before it can be activated.
Creating a Campaign (Dashboard)
Step 1 — Navigate to Payouts → Campaigns
Click the Payouts menu in the sidebar and select Campaigns.
.png)
Step 2 — Click "New campaign"
Initiate a new campaign from the campaigns list page.
%20(1).png)
Step 3 — Select brands
Choose from your available brand catalog. These are the options recipients will see on the redeem page.
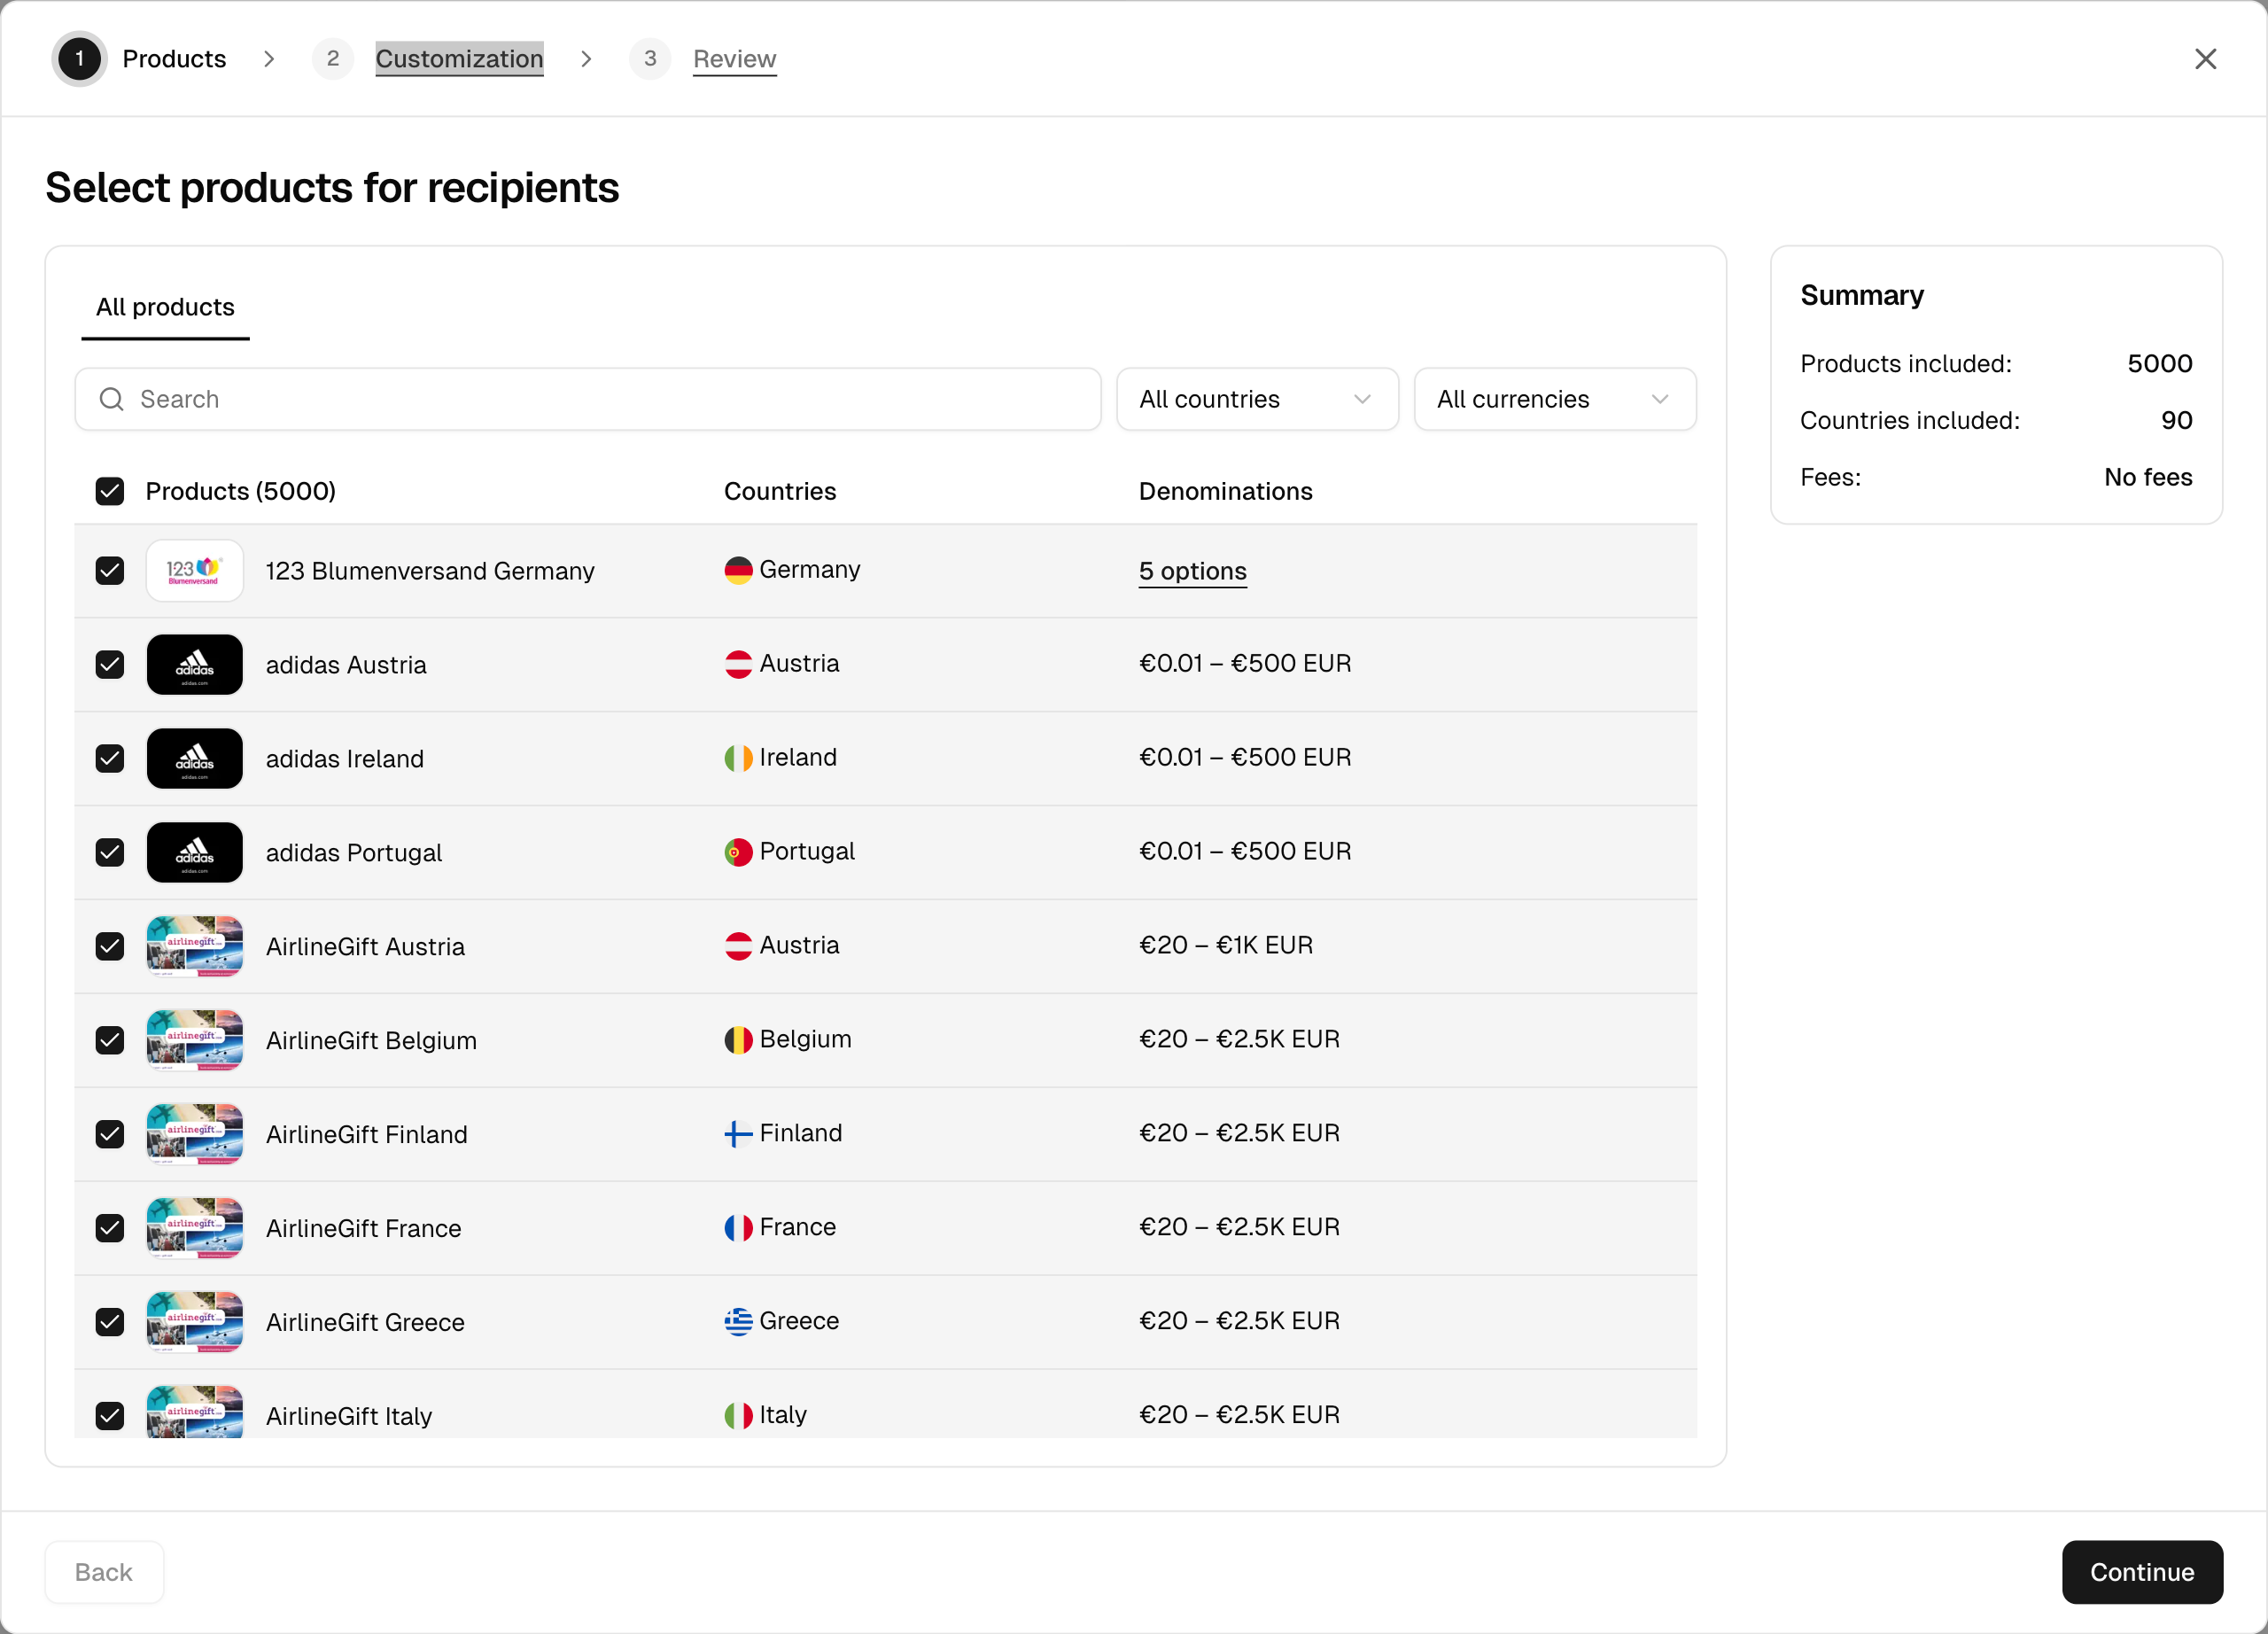
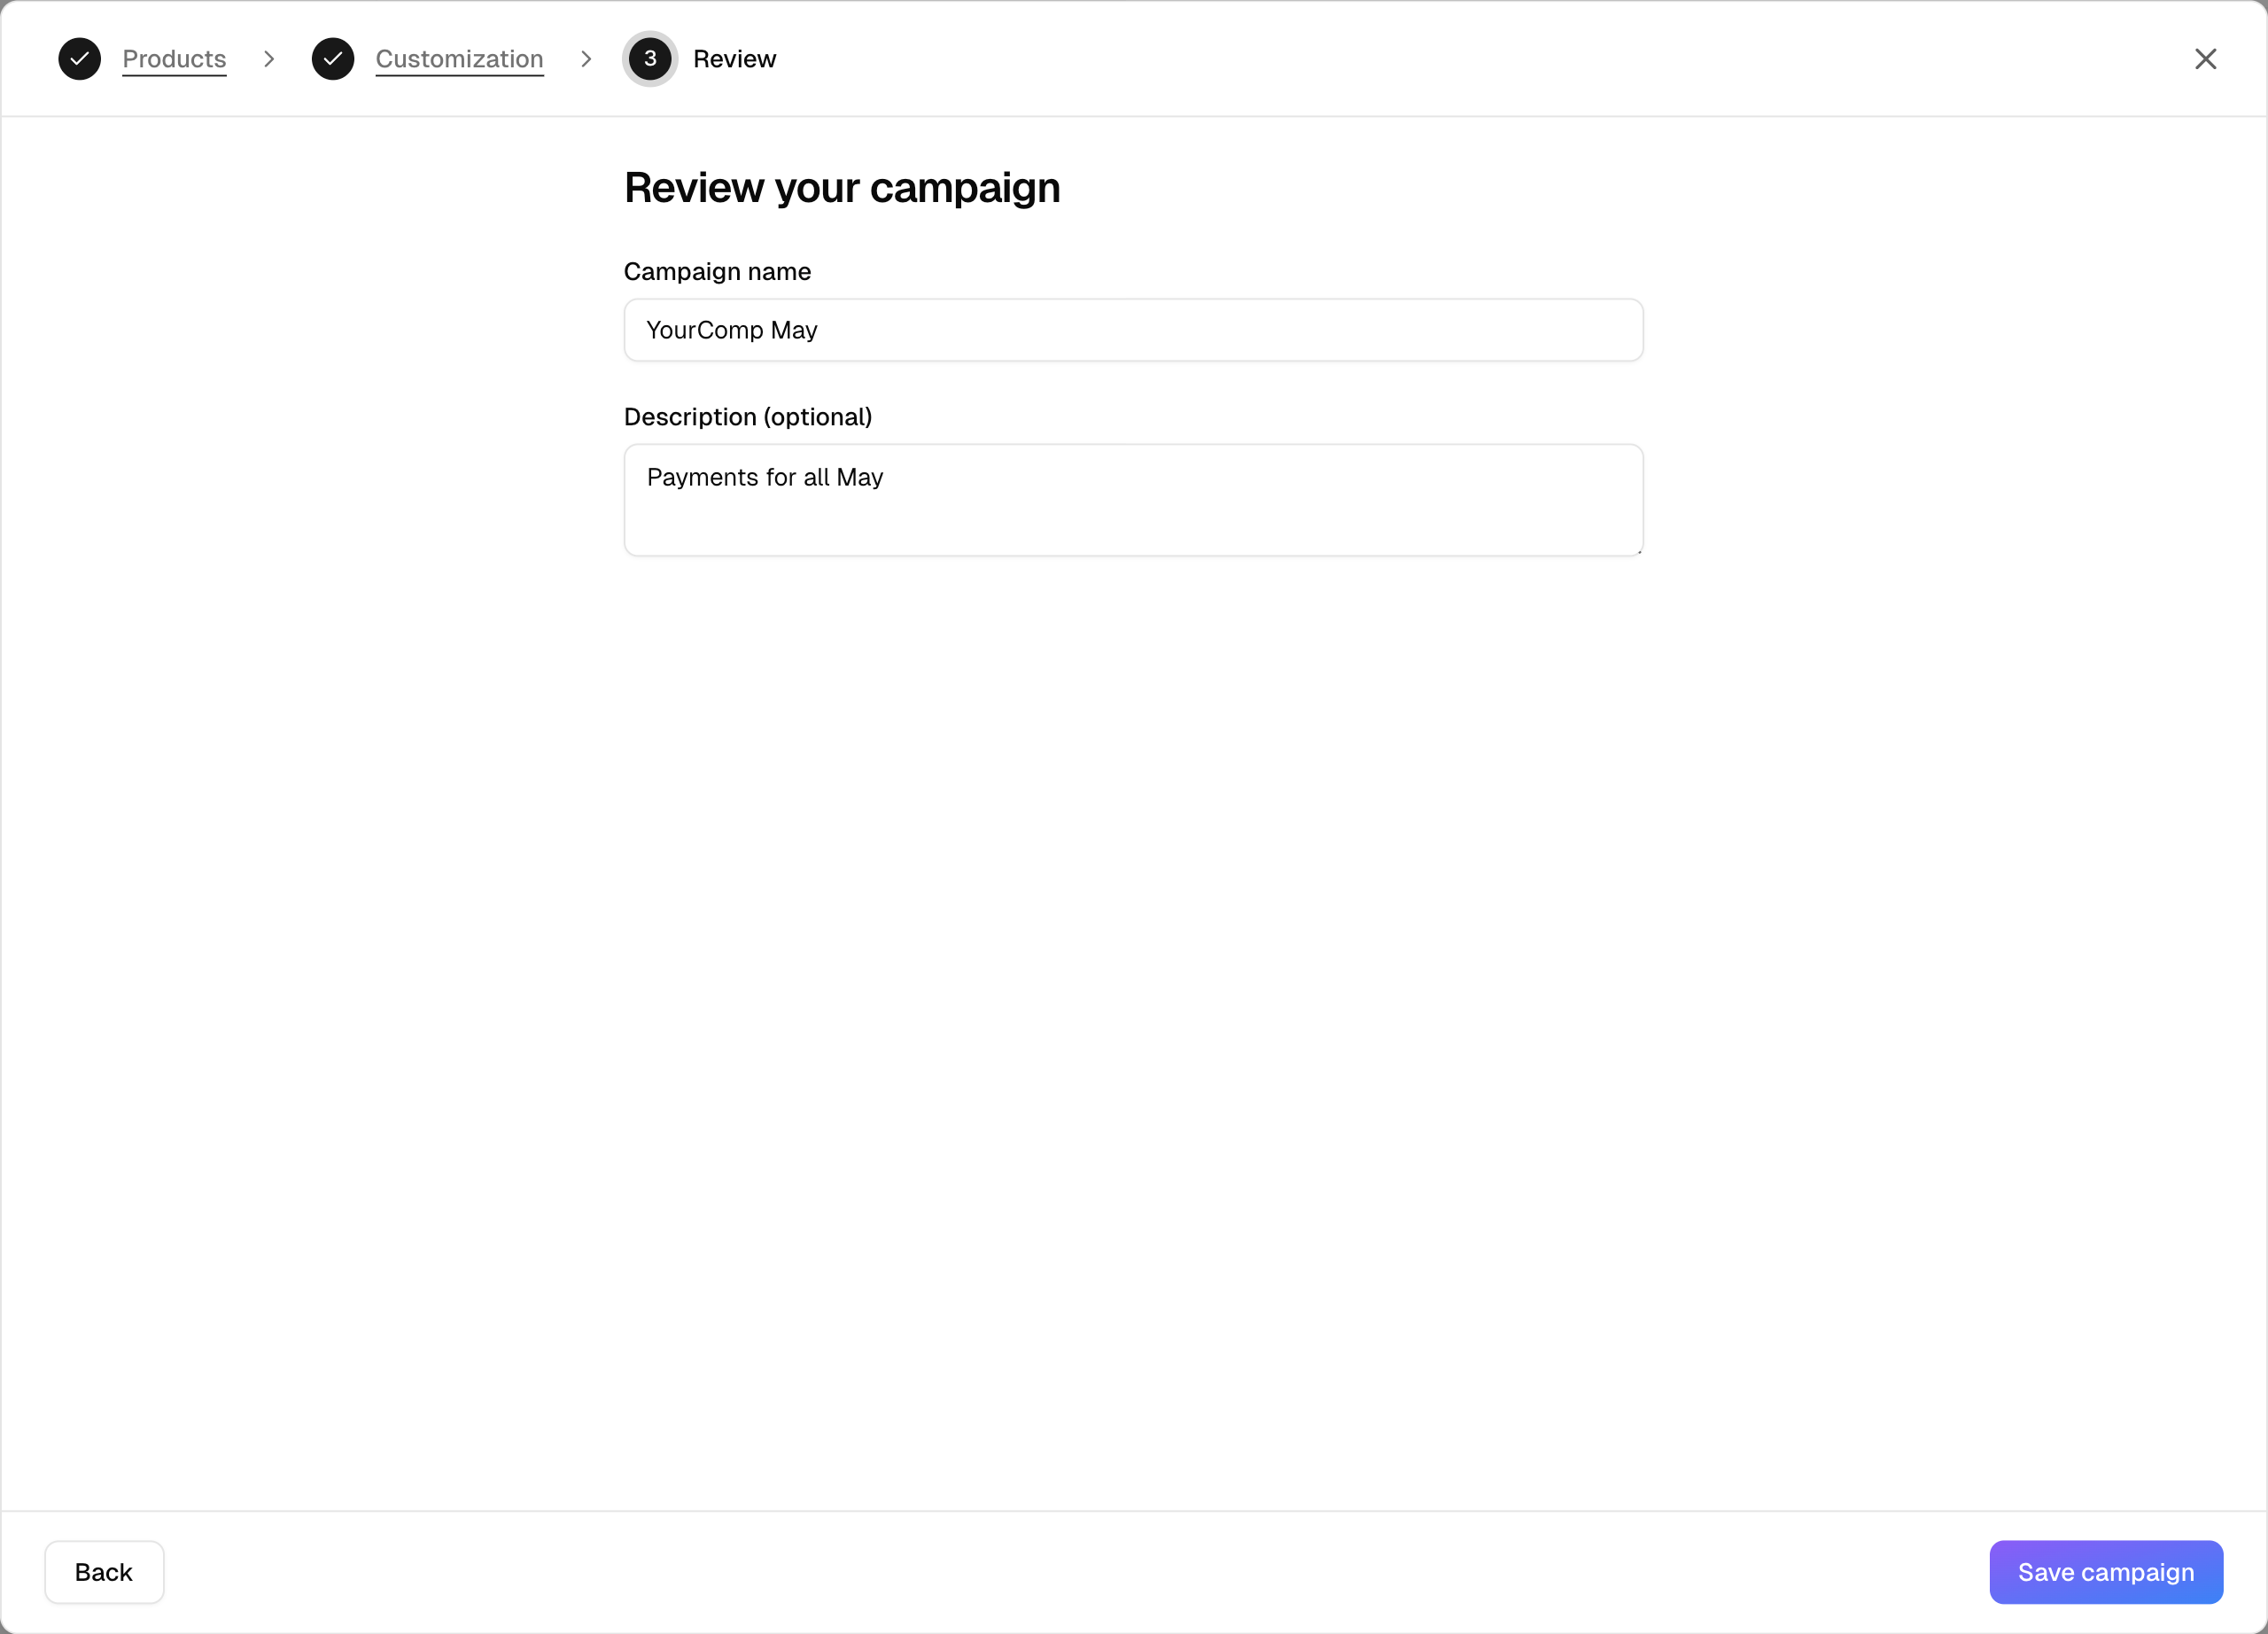
Step 4 — Fill in campaign details
- Title (required) — internal name for the campaign.
- Description (optional) — internal notes.
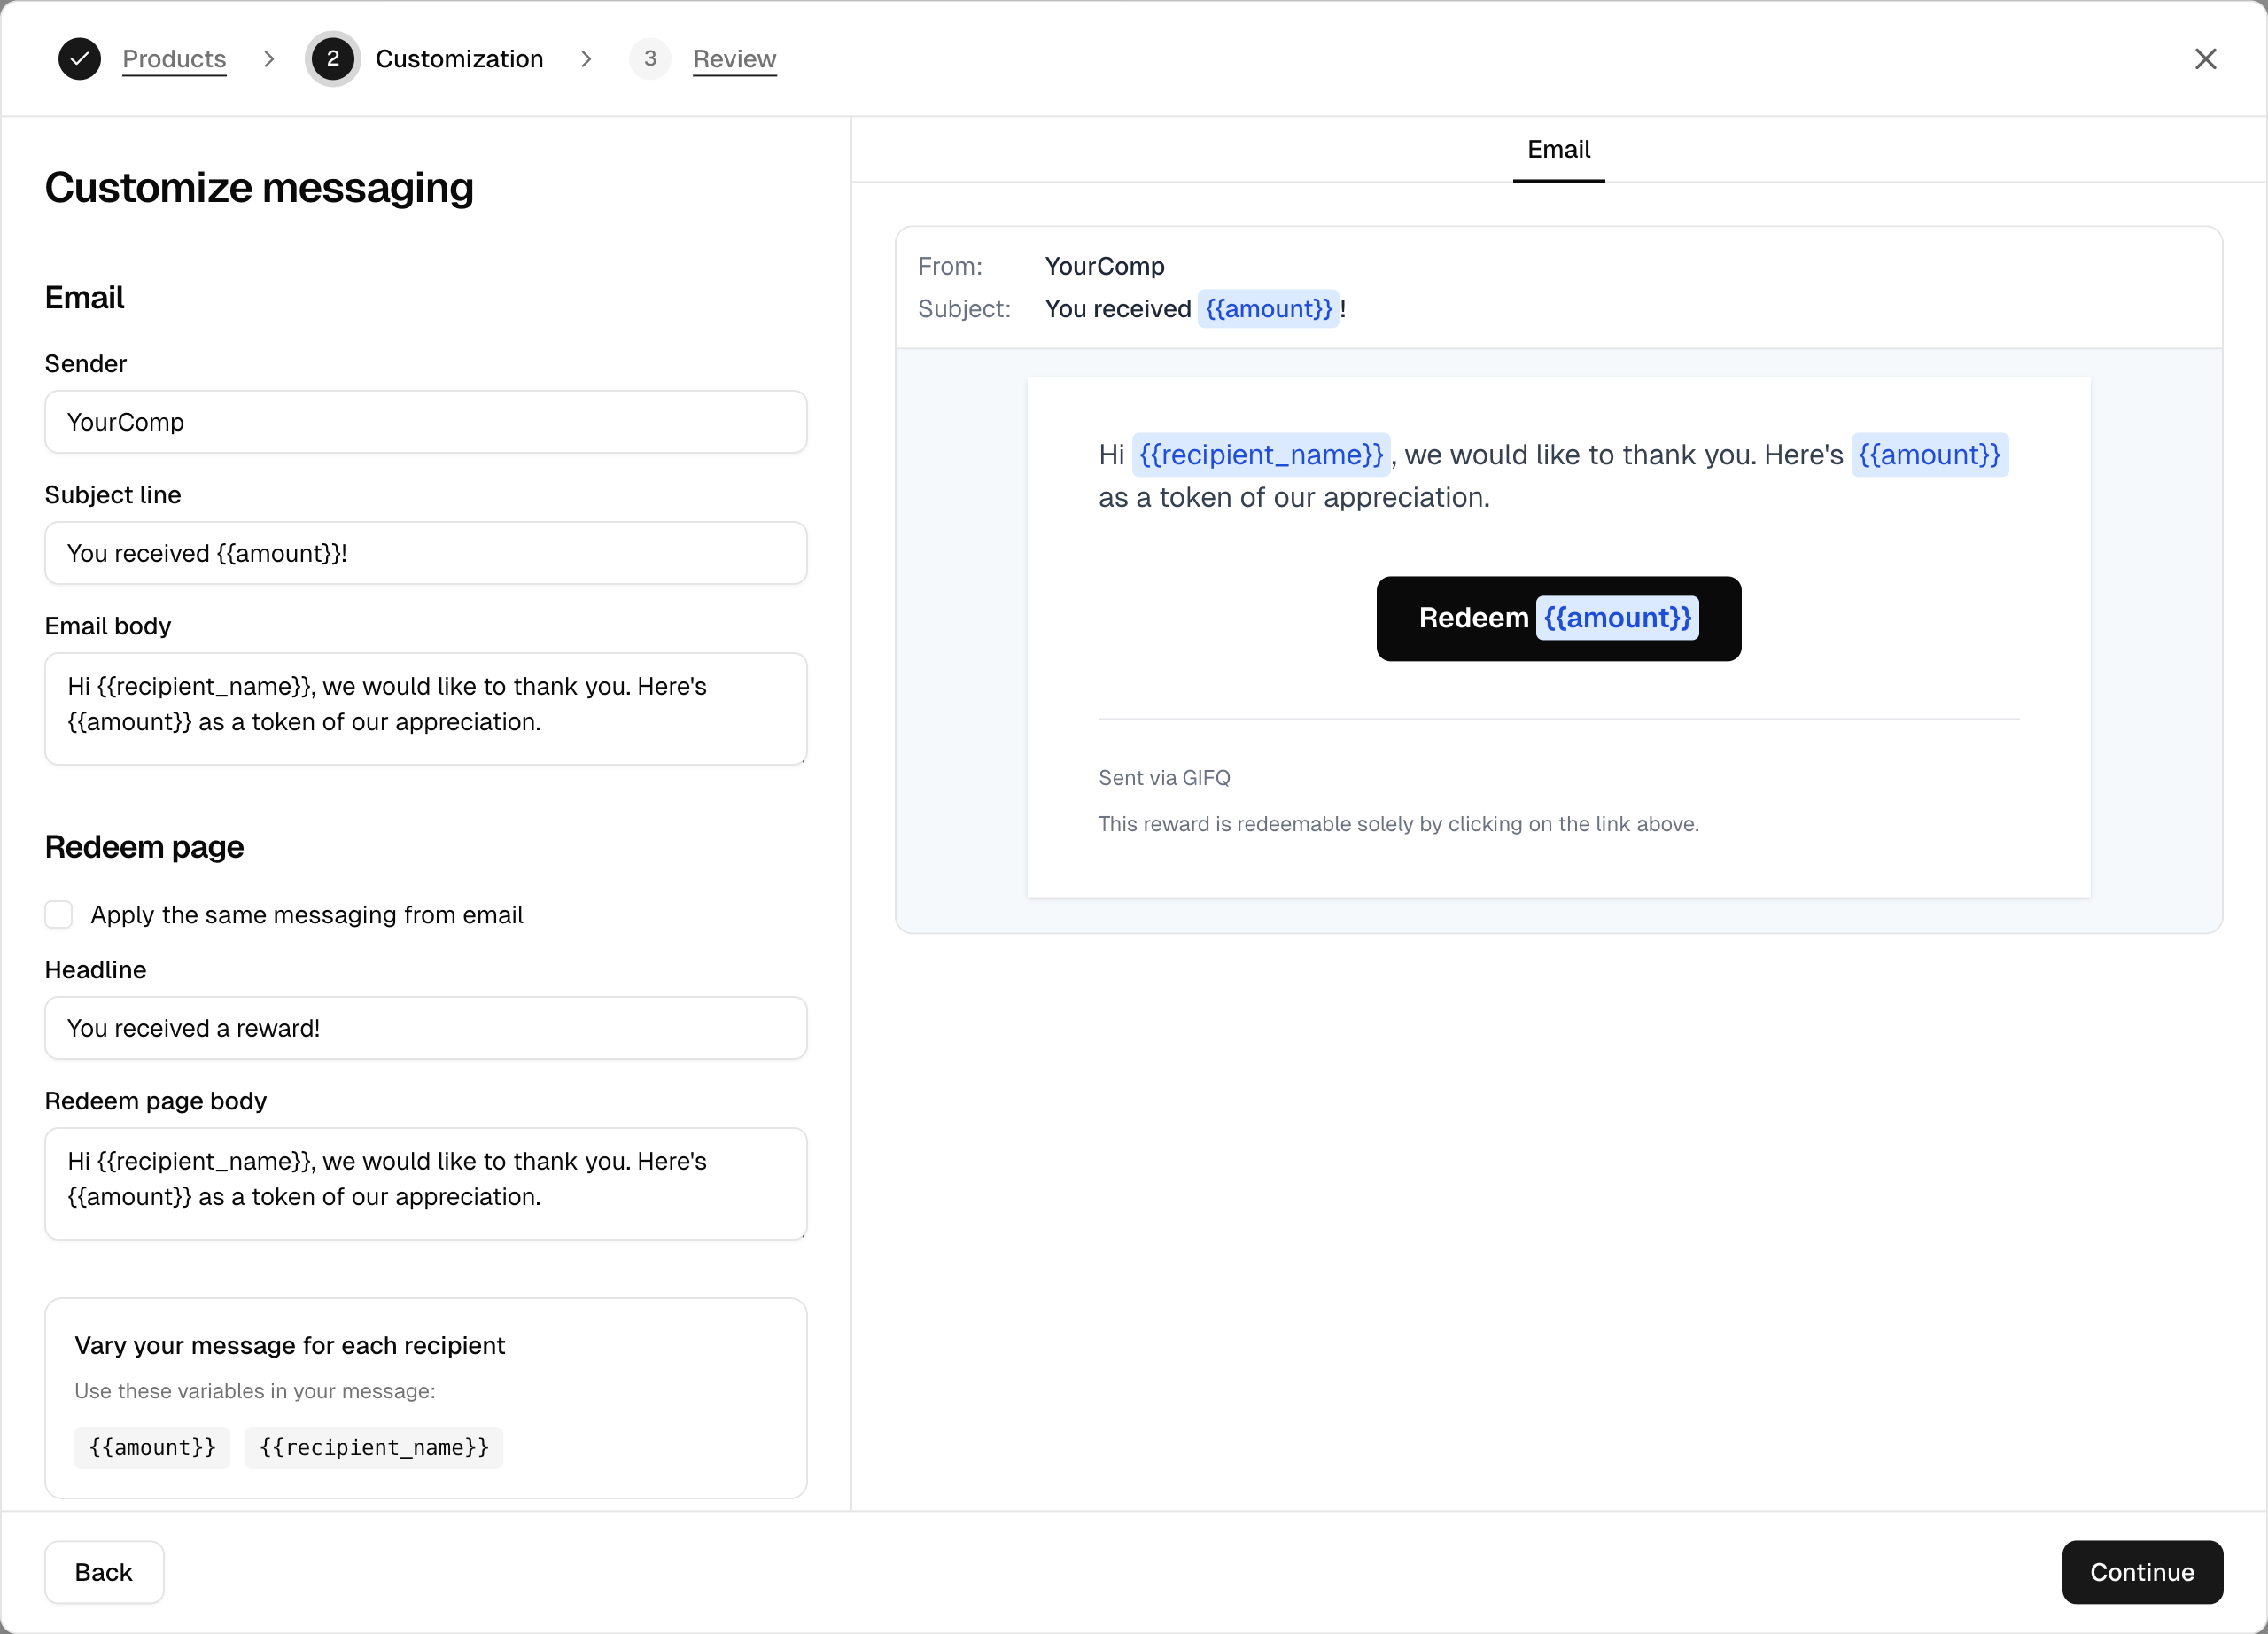
- Website Headline — shown on the redemption page. Supports
{{recipient_name}}and{{amount}}template variables. - Website Body — redemption page body text. Same variables available.
- Email Subject — subject line of the Redeem email. Supports
{{recipient_name}}and{{amount}}. - Email Body — body of the Redeem email. Same variables.
- Sender Name — shown as the From name on Redeem emails. Renaming the Sender takes effect on subsequent dispatches.
Step 5 — Save as Draft
Save your campaign in draft status. You can return to edit it any time before activation.
Activating a Campaign
Before activation, ensure all of the following are present:
- At least one brand selected.
- Email subject filled in.
- Email body filled in.
Once requirements are met, click the status transition button and select "Activate". The campaign is now live and ready for dispatching.
Dispatching Payout Orders
Step 1 — Open the campaign's order page
Access your active campaign and find the payout orders button.
Step 2 — Add recipients
For each recipient provide:
- email (required) — must be a valid address.
- name (optional) — used in template variables.
- amount (required) — positive decimal.
- currency (required) — ISO 4217 code.
Recipient limit
A single payout order can contain up to 1,000 recipients. Larger lists must be split across multiple orders.
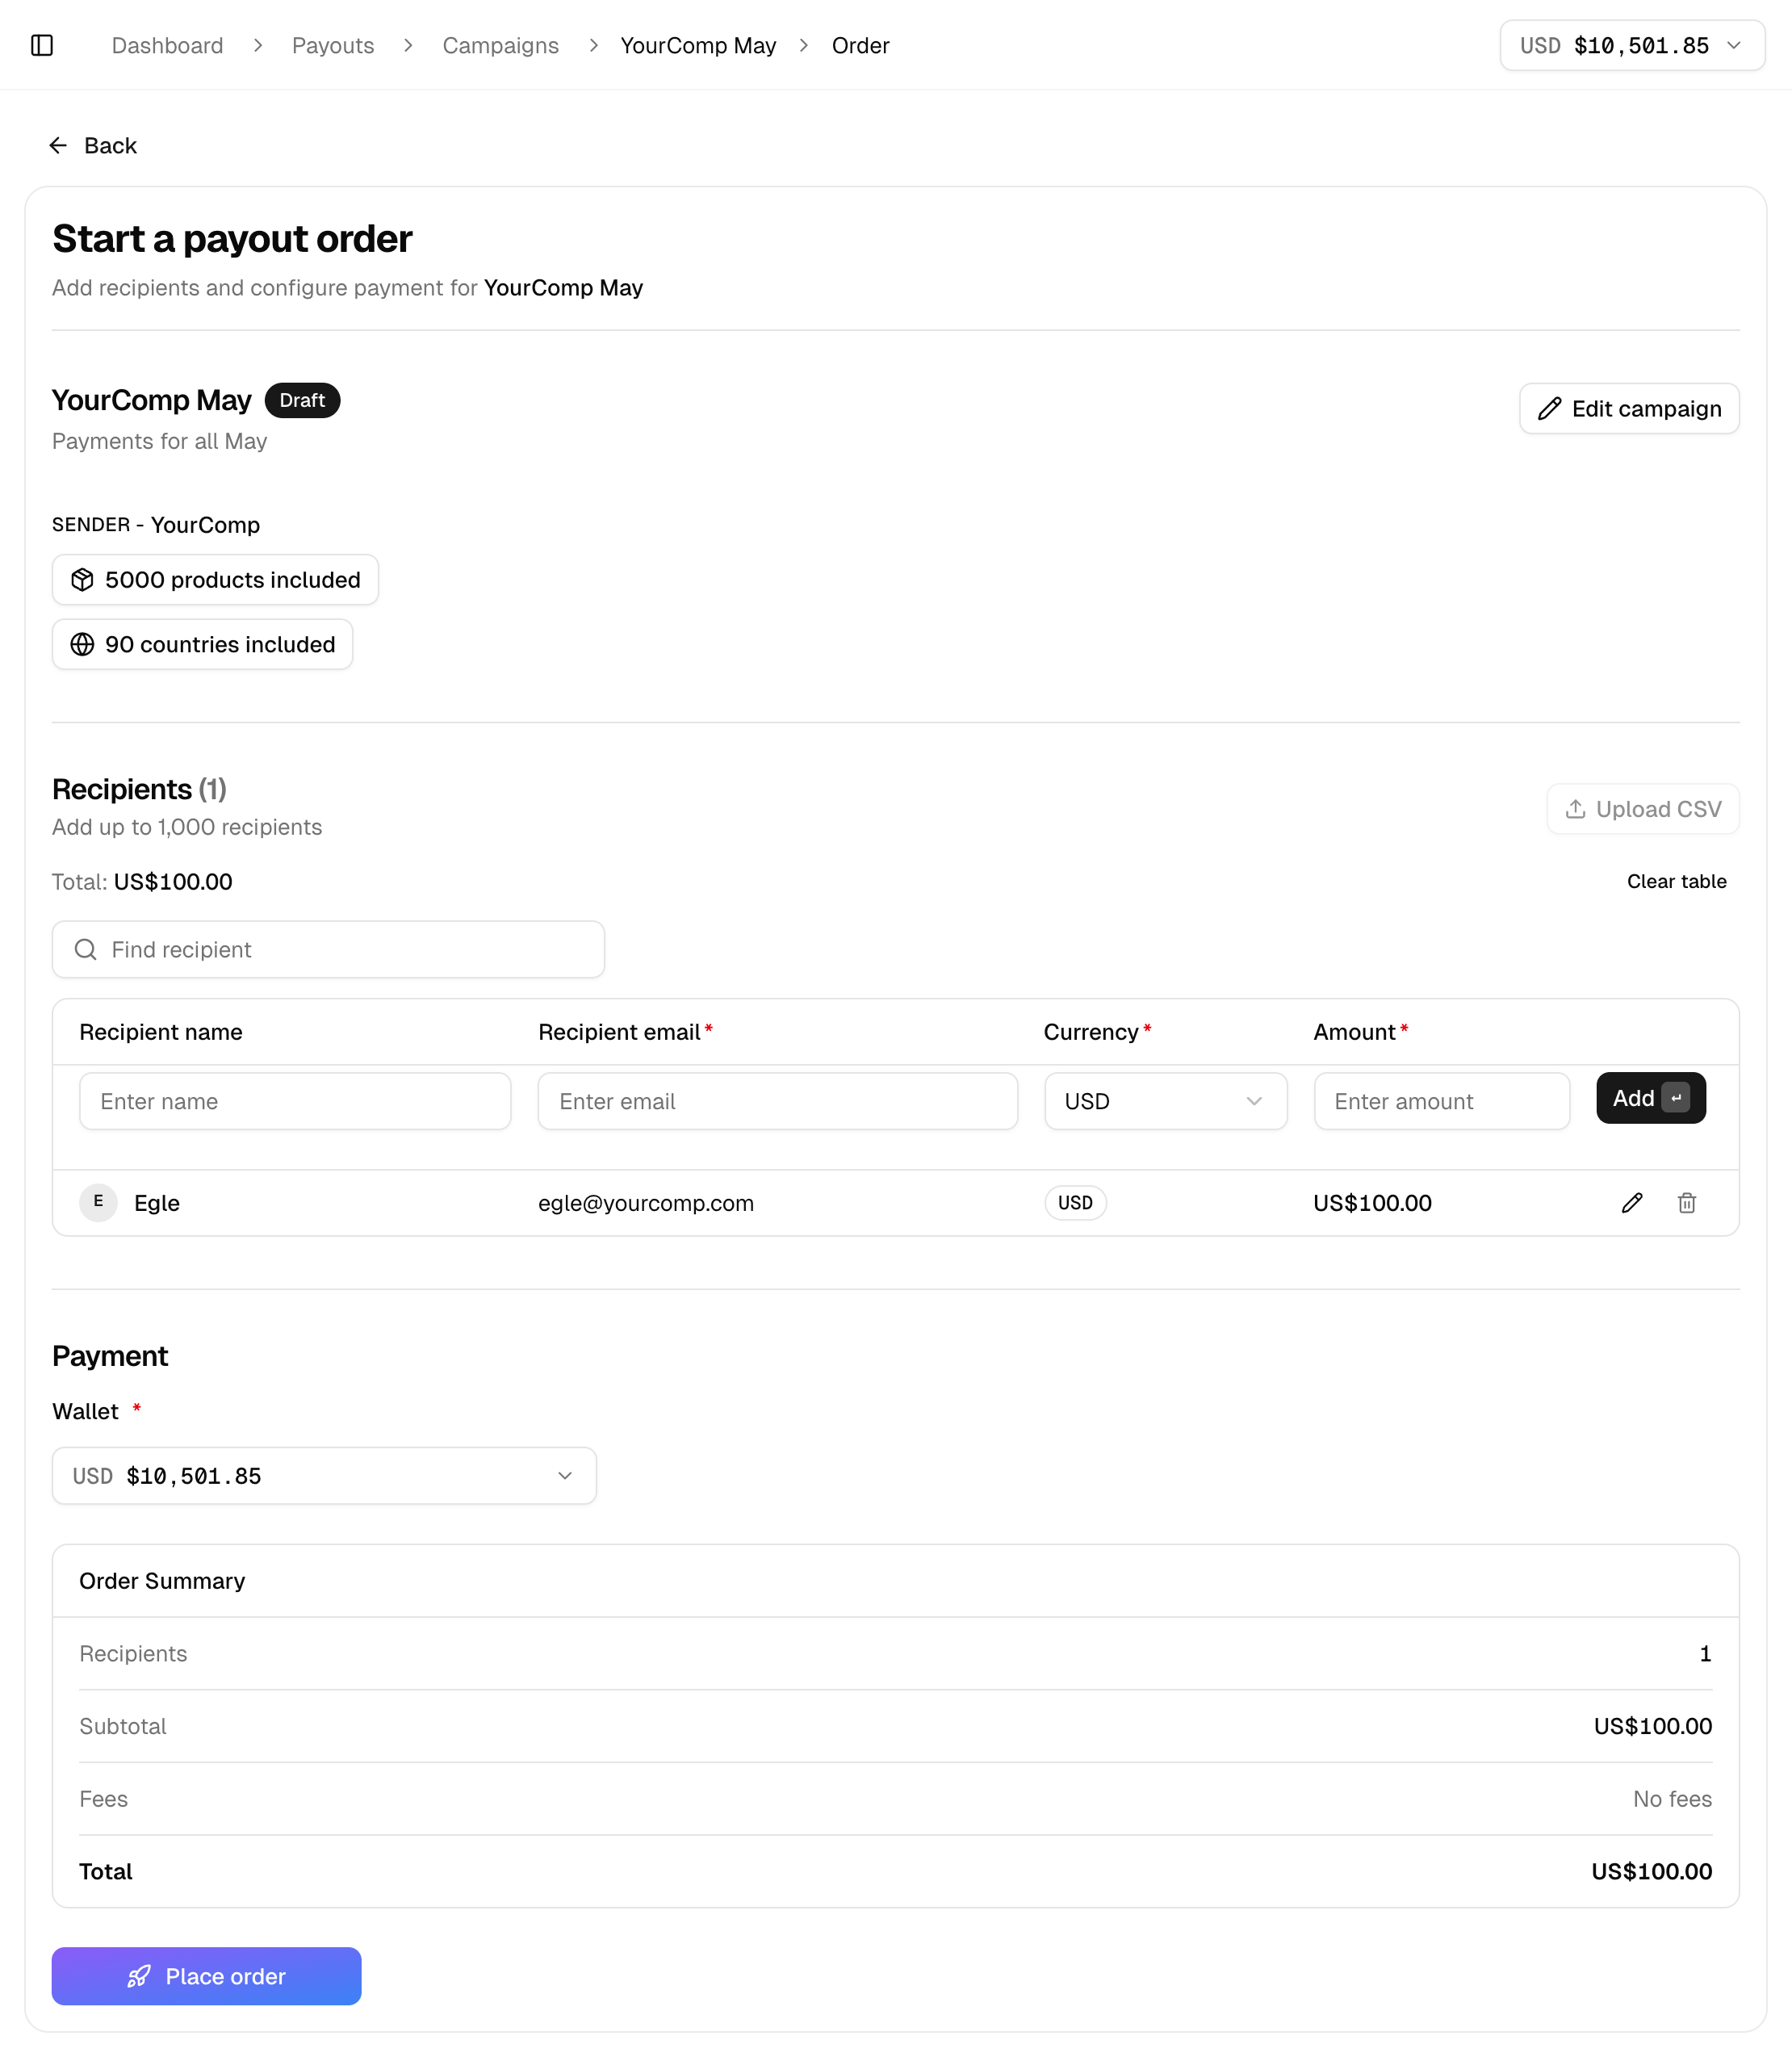
Step 3 — Review the order summary
Recipient count, total amount, applied exchange rates, and balance impact are displayed before confirmation.
Step 4 — Confirm and dispatch
Finalize the order. Payouts are processed immediately.
What happens behind the scenes
- Your company balance is deducted atomically — the order will fail with no records created if the balance is insufficient.
- A
PayoutOrderbatch is created with oneRecipientrecord per person. - A transaction record of type
payout_dispatchis logged. - Redeem emails are sent asynchronously — one per recipient.
- Each recipient receives a unique Redeem link to
redeem.gifq.com.
Tracking Payout Orders
The dashboard displays all payout orders with the following information: recipient email, amount, currency, status, campaign, and created at.
Recipient statuses
- Pending — created, email not yet sent.
- Sent — Redeem email delivered to the recipient's mail provider.
- Viewed — recipient opened the Redeem link (
viewed_attimestamp set). - Partially Redeemed — recipient redeemed some but not all of their balance.
- Redeemed — full amount redeemed; terminal state.
- Expired — Redeem link expired; remaining balance refunded.
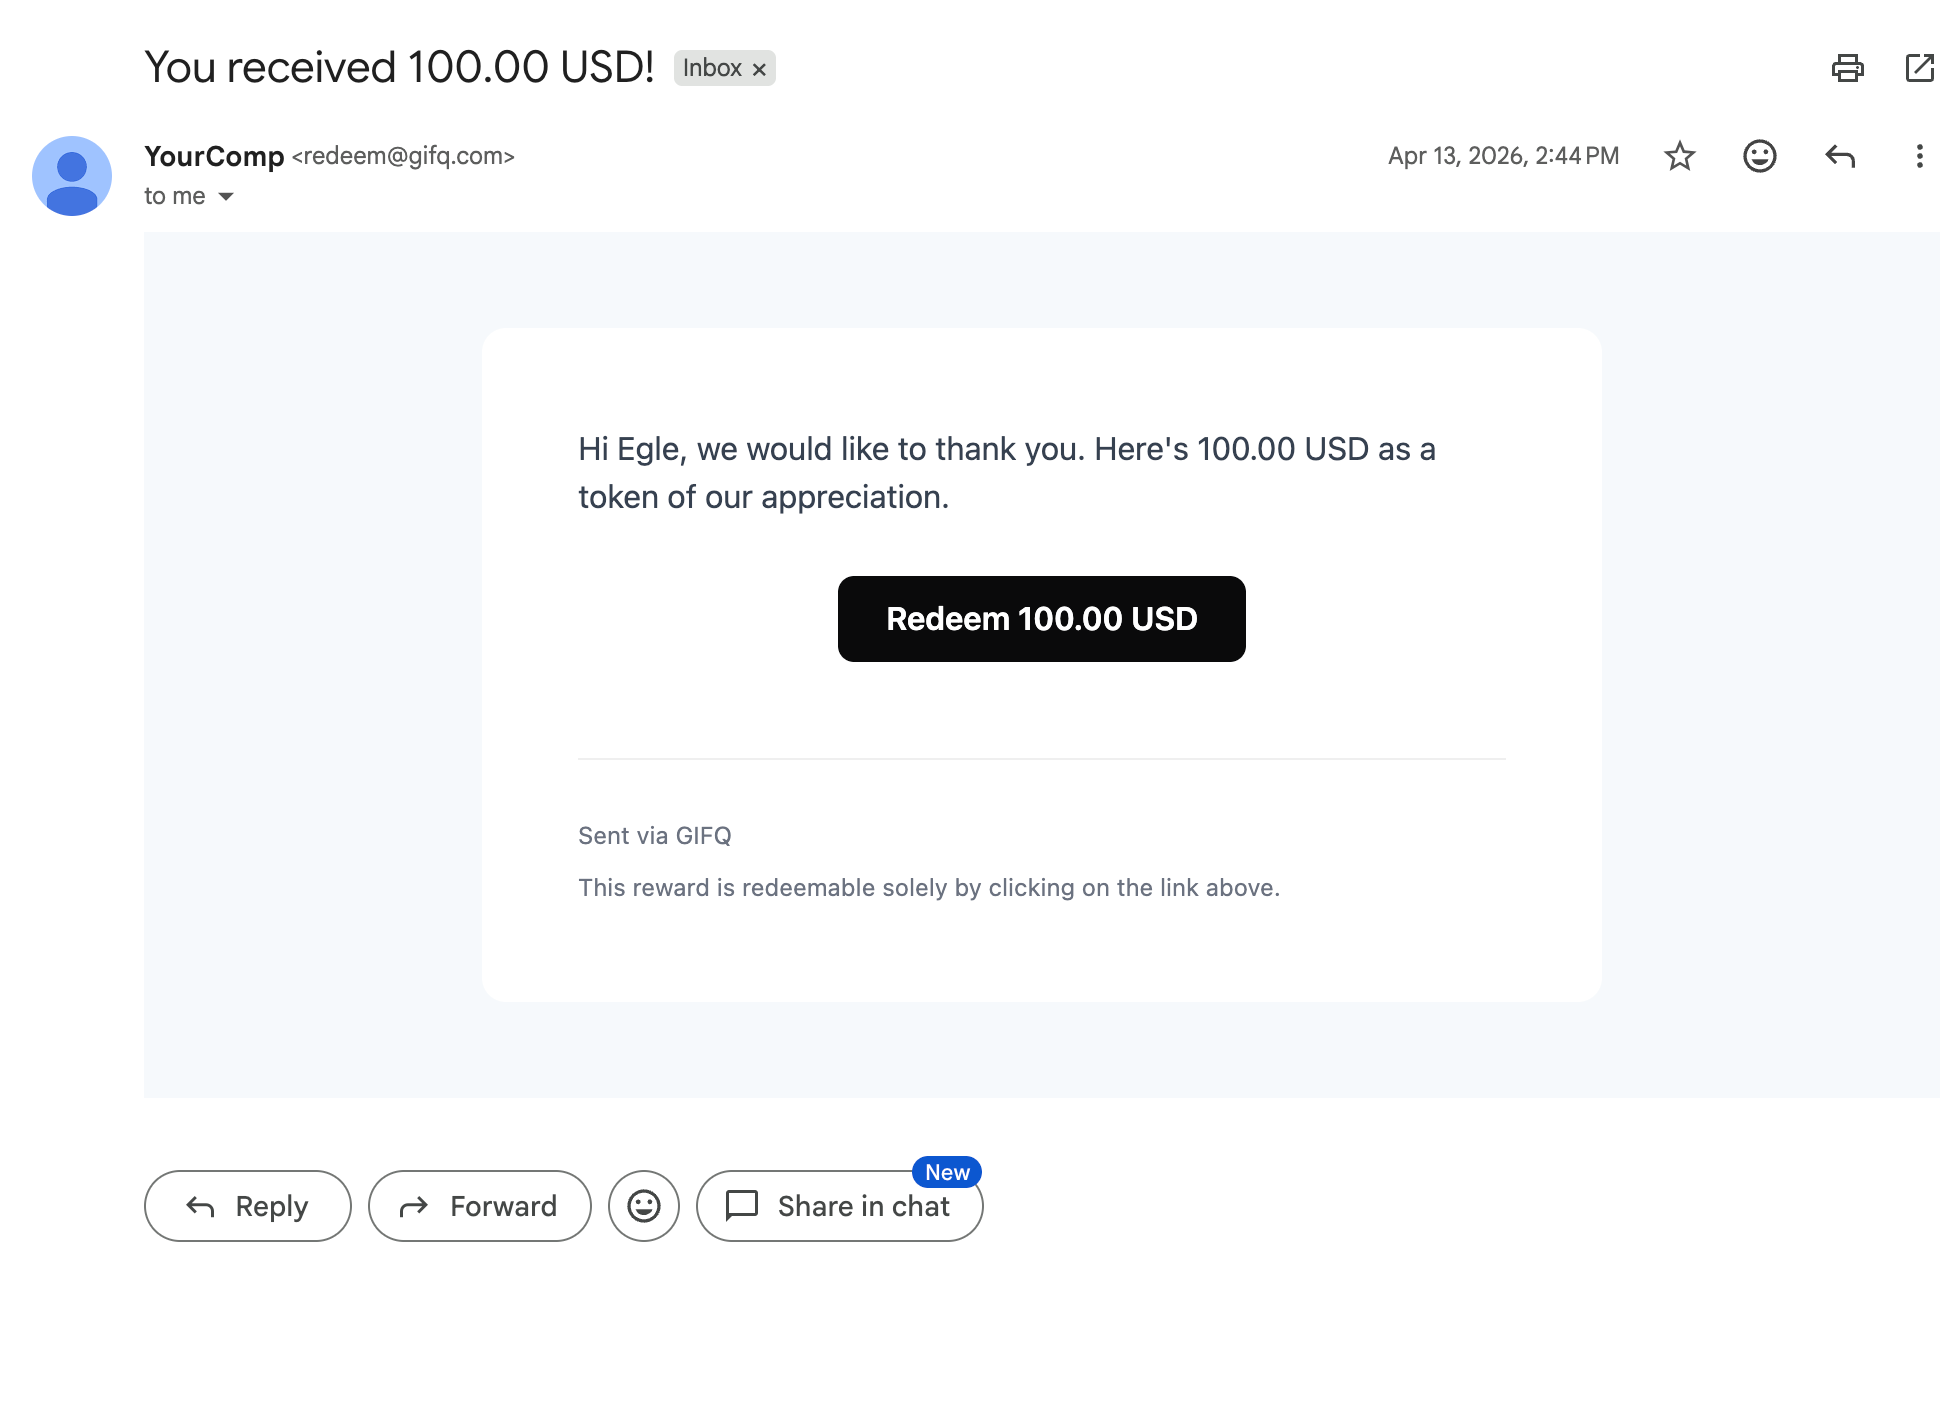
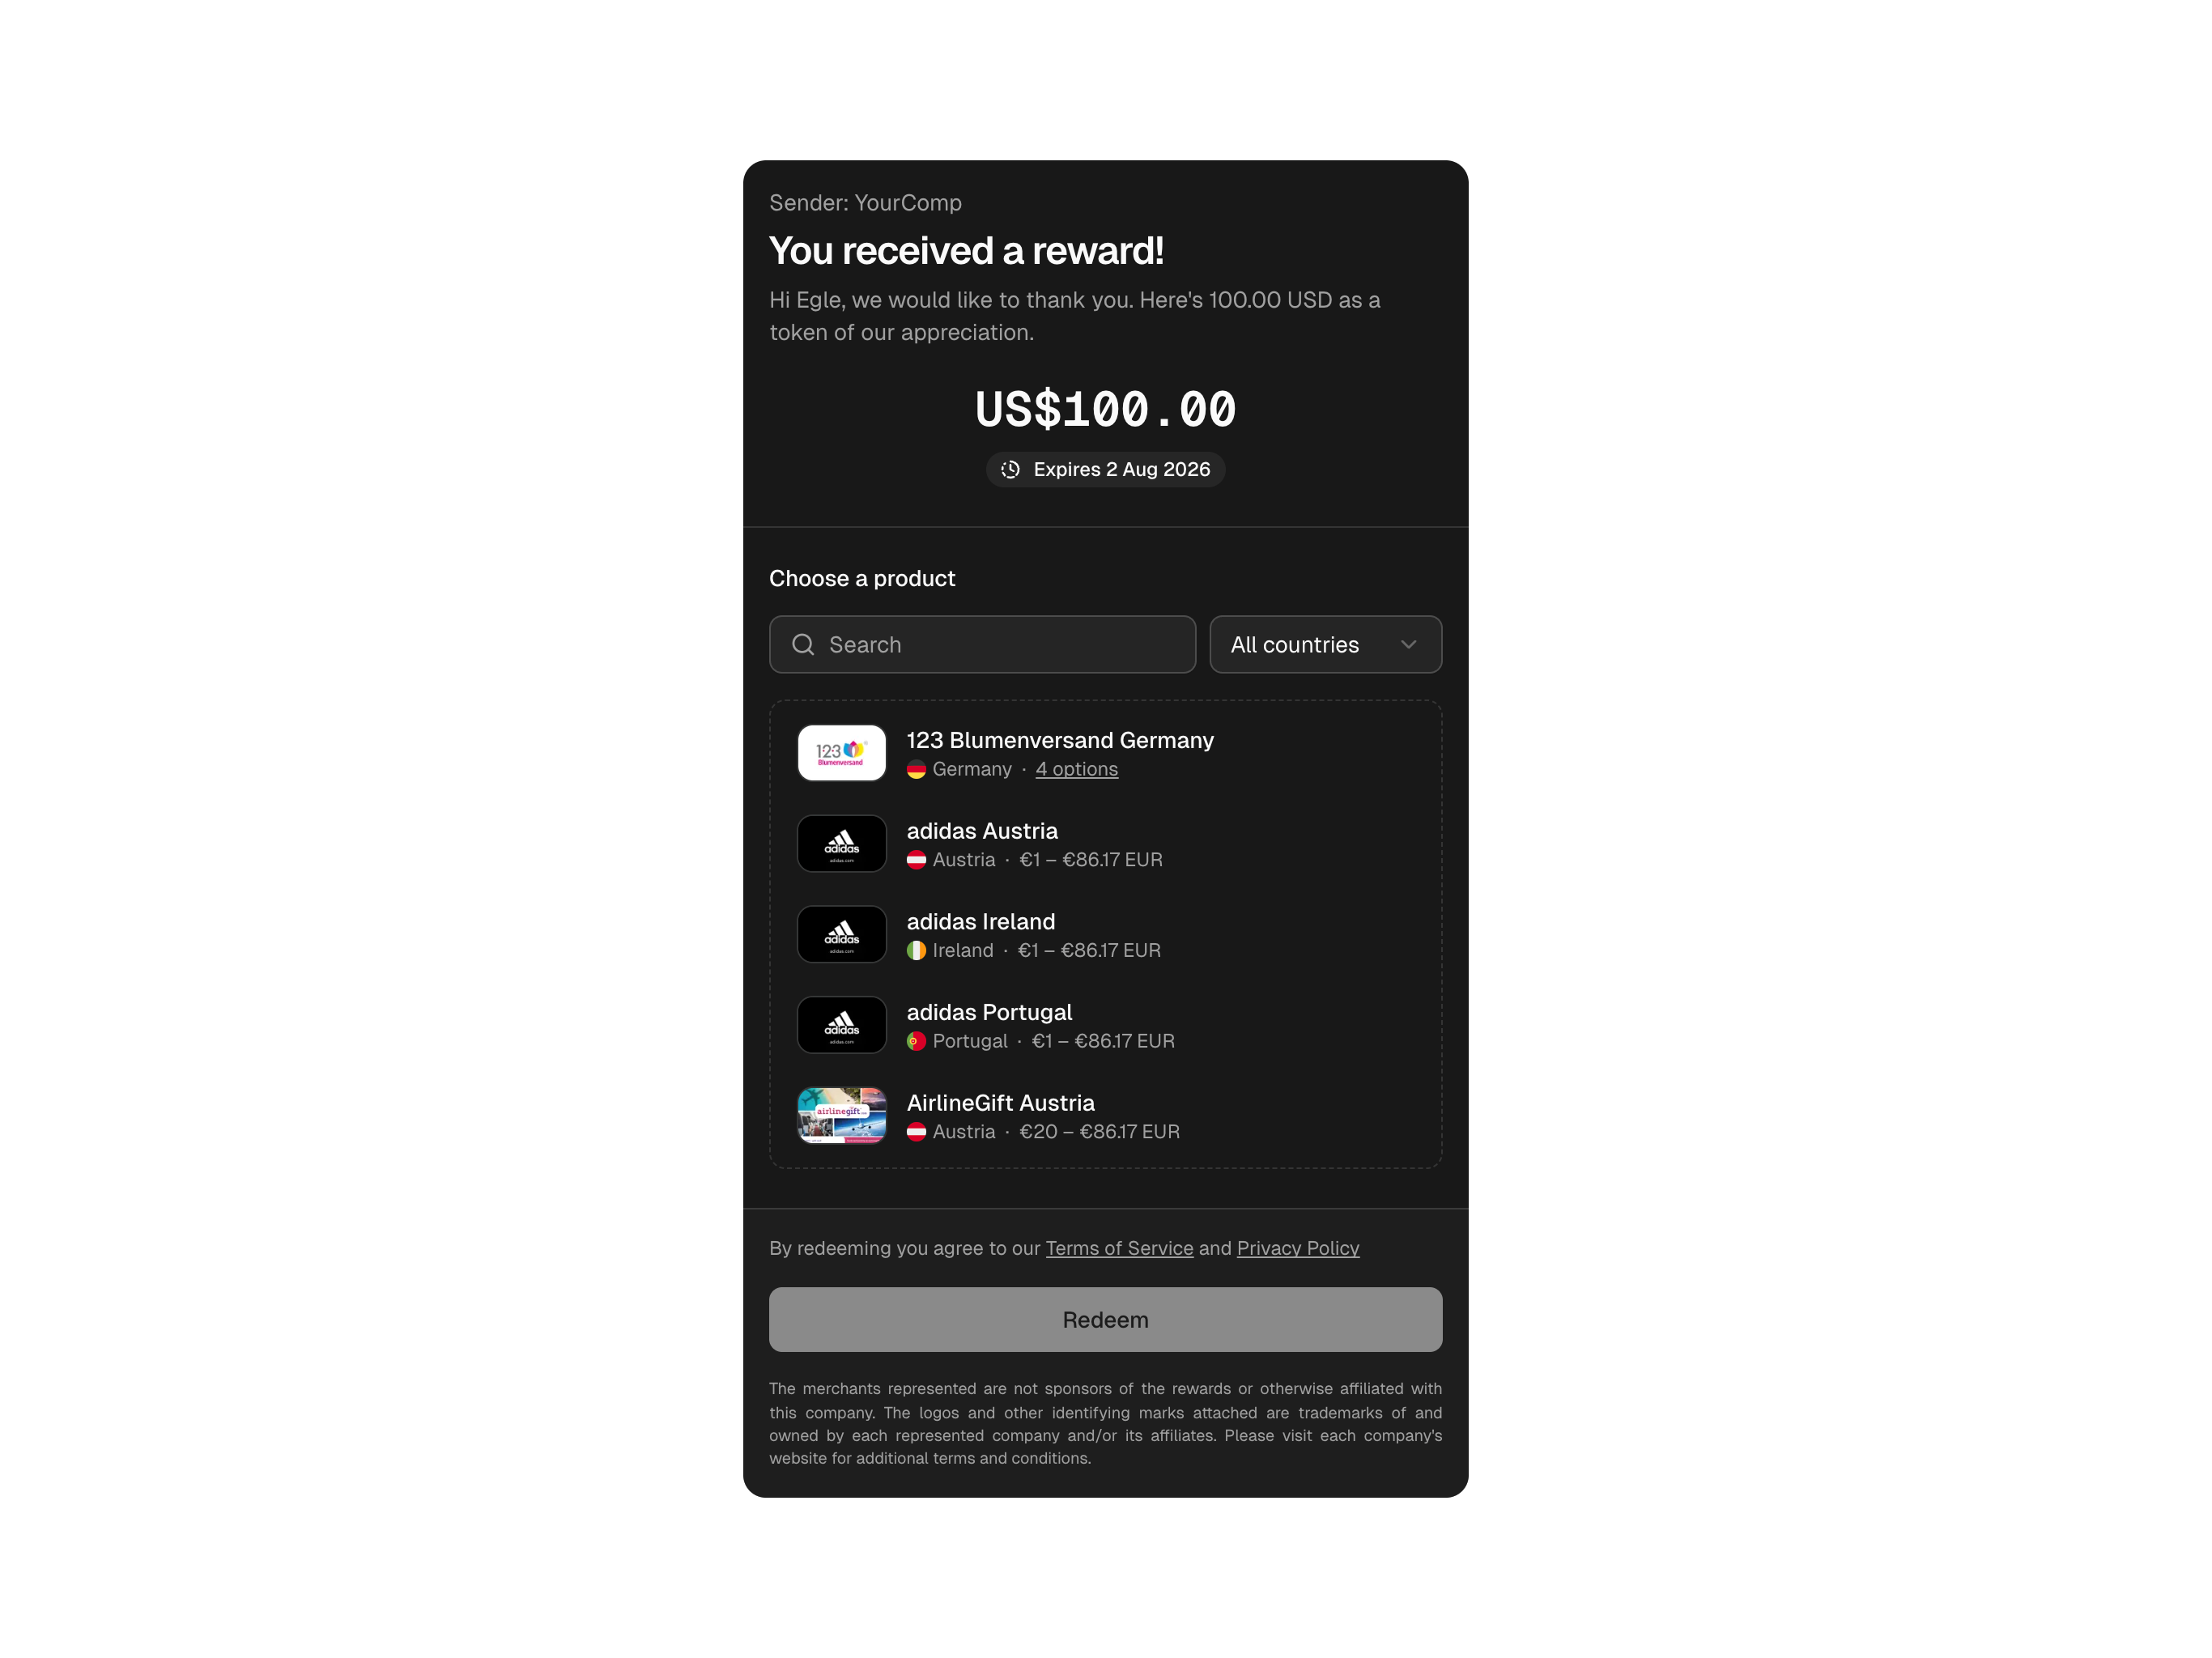
The Recipient Redemption Experience
Redemption is a two-step verified flow. Recipients click through from the email to a hosted page and complete a one-time-code verification before any redemption details are revealed. This protects both the sender and the recipient if a redeem email is forwarded or intercepted.
Step 1 — Branded Redeem email
The recipient receives a branded email built from your campaign's subject and body, containing a single "View Gift Card" CTA button.
Step 2 — Hosted redeem page and verification
Clicking the CTA lands the recipient on redeem.gifq.com/payout/<token>. Before any redemption details are shown, the recipient enters a one-time code (OTP) sent to their email. If the OTP becomes invalid (for example, after expiry), a fresh code is sent automatically — the recipient does not need to manually request a resend in the standard case.
Step 3 — Brand selection
After successful verification, the recipient sees the campaign's branding (headline, body, sender name) and the available brands with logos.
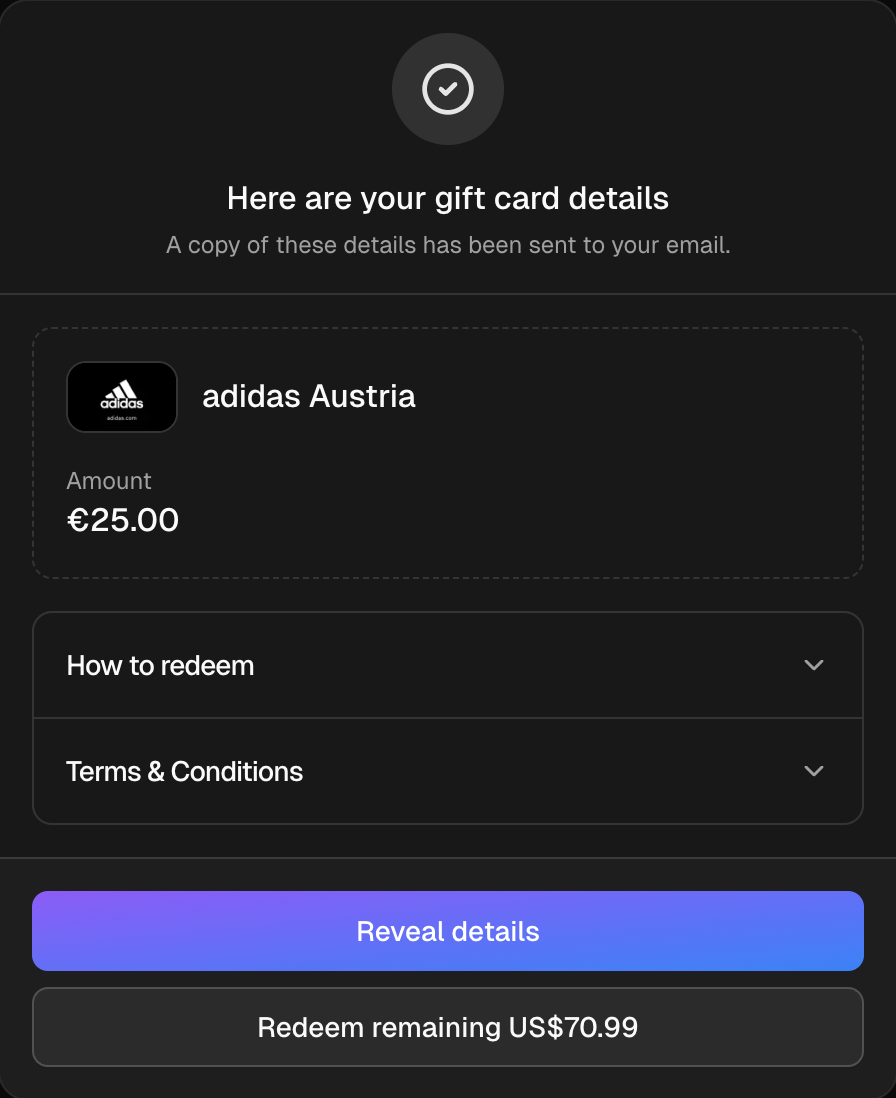
Step 4 — Reveal and redemption
Selecting a brand reveals the gift card details (code, PIN, instructions, terms) and sends a confirmation email containing the same details.

Step 5 — Partial redemption and history
If balance remains after a redemption, the recipient stays on the page and can choose another brand. The hosted /payout/<token> page also shows the recipient's redemption history, so they can revisit past redemptions and remaining balance at any time.
Managing Campaigns
- Editing — Draft campaigns are fully editable. Active and Paused campaigns allow text-field edits but not brand changes.
- Pausing — stops new dispatches. Existing payout orders continue (recipients can still redeem).
- Archiving — soft-deletes the campaign. Allowed only from Draft or Paused. An Active campaign must be paused before it can be archived.
Using the API
Everything in this guide — creating campaigns, dispatching payouts, tracking orders — can also be done programmatically through the GIFQ API. The API is the right choice when you want to embed payouts inside your own product, automate dispatches from your existing tooling, or build recurring workflows.
Where to get started
Full API documentation, including authentication, endpoint reference, request and response schemas, and a sandbox environment, lives at docs.gifq.com. Two pages are particularly useful when you start:
- Getting Started — how to set up your account, get sandbox credentials, and move to production.
- Authentication — how API keys work, sandbox vs production, and how to keep them secure.
What the API gives you
- Create and manage campaigns programmatically.
- Dispatch payout orders to recipient lists, with the same 1,000-recipient-per-order limit as the dashboard.
- Query payout orders and individual payouts, with filters by status, campaign, and recipient.
- Test end-to-end against the sandbox before flipping a single config flag to go live.
Sandbox first
Every account gets a sandbox environment with mock data and separate API credentials. Build and test against sandbox; switch to production credentials only when you are ready to send real payouts.
Good to Know
- Expiration is a system default. Unredeemed payouts expire after a default period set globally for your account; it is not configured per dispatch. Remaining balance on expired payouts is automatically refunded to the company balance.
- Email body line breaks: the email body field renders as a single block of text. To create visual separation, write in short, single-paragraph copy rather than relying on line breaks.
- Email delivery: if a recipient reports they did not receive the email, verify the address is correct and ask them to check their spam folder. Most provider-side delivery issues resolve on retry.
- Currency mix and worldwide brands: when using worldwide (
WW) brands, the recipient's currency must match a currency available among the campaign's selected brands. If you anticipate cross-currency redemption, include brands that cover each recipient currency you plan to dispatch in.
Troubleshooting
Can't activate campaign. Cause: missing email subject or body, or no brands selected. Resolution: add the required fields, then transition to Active.
Dispatch fails with insufficient balance. Cause: company balance is below the order total. Resolution: top up the company balance and retry.
Dispatch fails with duplicate-email error. Cause: two or more recipients in the same order share an email address (case-insensitive). Resolution: deduplicate the recipient list and retry.
Dispatch fails with recipient-limit error. Cause: order contains more than 1,000 recipients. Resolution: split the recipient list across multiple payout orders.
Recipient email not received. Cause: invalid address, spam folder, or provider-side delivery delay. Resolution: verify the recipient address and ask them to check spam.
Redeem link shows "Expired." Cause: payout exceeded the default expiration window. Resolution: dispatch a new payout. The expired balance is automatically refunded to the company balance.
Recipient stuck on verification screen. Cause: one-time code has expired or was not delivered. Resolution: a fresh code is sent automatically when the previous one becomes invalid. If the recipient still has trouble, they can press "Resend Code" on the verification screen.
Cross-currency redemption fails for WW products. Cause: recipient currency has no match among the selected products. Resolution: add a brand with a matching currency, or align the recipient's currency to one supported by the campaign's brand mix.
Can't archive active campaign. Cause: archiving is only allowed from Draft or Paused. Resolution: pause the campaign first, then archive.
.svg)
